We have a list of Horizontal CSS Drop down Menus for Blogspot Blogs, you need to choose the menu and add the code to your blog. you might have seen the article about How to Add Navigation menu in blogger on geek blogger.
Below is a Memorandum of Drop down Menus, you can add any menu from the list given in below image.
 so
lets start now introducing the menus one bye one, whichever you like
just copy code and paste the code, you can also customize the menus
online and then copy the code. Below Menus are from the Above image and
menu numbers are 1 to 18 respectively.
so
lets start now introducing the menus one bye one, whichever you like
just copy code and paste the code, you can also customize the menus
online and then copy the code. Below Menus are from the Above image and
menu numbers are 1 to 18 respectively.1. Massive Blue Drop Down menu: Demo | Download Source
2. Sunrise Gloss: Demo | Download Source
3. Blue Dawn Drop Down: Demo | Download Source
4. Blue Center Drop Bar: Demo | Download Source
5. Black Center Drop Bar: Demo | Download Source
6. Blue Impression Drop Down Menu: Demo | Download Source
7. Green Impression Drop Down Menu: Demo | Download Source
8. Sunrise Gloss: Demo | Download Source
9. Blue Tabbed Drop Down: Demo | Download Source
10. Yellow Tabbed Drop Down Menu: Demo | Download Source
11. Tabbed Grey Drop Down: Demo | Download Source
12. Red Tabbed Drop Down: Demo | Download Source
13. Black Tabbed Drop Down: Demo | Download Source
14. Orange Tabbed Drop Down: Demo | Download Source
15. Simple Red: Demo | Download Source
16. Simple Black: Demo | Download Source
17. Simple Blue: Demo | Download Source
18. Simple Green: Demo | Download Source
- Select Any one menu from the above given list and download the .zip file which should contain HTML file, Images and CSS files for the menu.
3 Mandatory things you must have before going ahead.
- HTML File - Contains the code of the menu
- Images folder - Contains Images used in menu
- CSS file - Contains Style used in menu
Note: Before making any changes to your template, take a full backup of your blogger template.#Step 1. Log in to your Blogger Dashboard and Navigate to Design > Page Element.
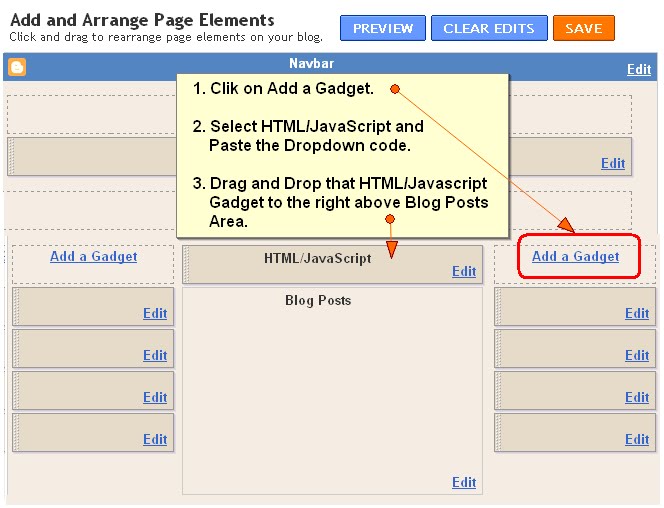
#Step 2. Click on Add a Gadget > HTML/JavaScript link and insert the following type of code (You will get it from Downloaded HTML file) and click Save button.
<div class="menu">

<ul>

<li><a href="#">Home</a></li>

<li><a id="current" href="#">Products</a>

<ul>

<li><a href="#">Drop Down CSS Menus</a></li>

<li><a href="#">Horizontal CSS Menus</a></li>

<li><a href="#">Vertical CSS Menus</a></li>

<li><a href="#">Dreamweaver Menus</a></li>

</ul>

</li>

<li><a href="/faq.php">FAQ</a>

<ul>

<li><a href="#">Drop Down CSS Menus</a></li>

<li><a href="#">Horizontal CSS Menus</a></li>

<li><a href="#">Vertical CSS Menus</a></li>

<li><a href="#">Dreamweaver Menus</a></li>

</ul>

</li>

<li><a href="/contact/contact.php">Contact</a></li>

</ul>

</div>
#Step 3. Now Drag & Drop that Widget to the top of the Blog Posts Section.

How to Add CSS for Menu:
#Step 4. Now Navigate to Design > Edit HTML Section.

- Find this type of code ]]></b:skin> and replace it with this type of CSS Code (You will get the .css file in your downloaded folder) :
.menu{

border:none;

border:0px;

margin:0px;

padding:0px;

font-family:verdana,geneva,arial,helvetica,sans-serif;

font-size:14px;

font-weight:bold;

color:8e8e8e;

}

.menu ul{

background:url(images/menu-bg.gif) top left repeat-x;

height:43px;

list-style:none;

margin:0;

padding:0;

}

.menu li{

float:left;

}

.menu li a{

color:#666666;

display:block;

font-weight:bold;

line-height:43px;

padding:0px 25px;

text-align:center;

text-decoration:none;

}

.menu li a:hover{

color:#000000;

text-decoration:none;

}

.menu li ul{

background:#e0e0e0;

border-left:2px solid #0079b2;

border-right:2px solid #0079b2;

border-bottom:2px solid #0079b2;

display:none;

height:auto;

filter:alpha(opacity=95);

opacity:0.95;

position:absolute;

width:225px;

z-index:200;

/*top:1em;

/*left:0;*/

}

.menu li:hover ul{

display:block;

}

.menu li li {

display:block;

float:none;

width:225px;

}

.menu li ul a{

display:block;

font-size:12px;

font-style:normal;

padding:0px 10px 0px 15px;

text-align:left;

}

.menu li ul a:hover{

background:#949494;

color:#000000;

opacity:1.0;

filter:alpha(opacity=100);

}

.menu p{

clear:left;

}

.menu #current{

background:url(images/current-bg.gif) top left repeat-x;

color:#ffffff;

}
]]></b:skin>


ဒီလိုေတြထြင္လို႕ရပါတယ္ဖတ္ၾကည့္ပီးစမ္းၾကည့္ေနာ္ပံုနဲ႕ျပထာေတာ့ျမန္မာလိုျပန္ေပးဖ်ို႔မလိုေတာ့ဘူးဆိုေတာ့မျပန္ေပးေတာ့ဘူးေနာ္..ဟဲဟဲအဆင္ေျပက်ပါေနာ္
